

When you move to a new iPhone you don’t want to spend ages setting everything up from scratch to get the apps, data and settings just the way you like them. That’s why restoring from a backup is so convenient: one quick tap, a bit of a wait, and you’re good to go.
The same is true if a phone malfunctions badly, or is bricked, lost or stolen. Knowing you can recover your photos, documents and data easily from an iCloud or iTunes backup is very reassuring.
Yes, backups are an essential part of the modern digital life, which is why we put together our How to back up an iPhone or iPad guide. But knowing how to restore an iDevice from that backup is just as important. Read on for our complete guide.
Have you got a recent backup?
First things first: make sure you’ve got a backup that you can restore from. Crucially, this backup needs to be recent enough to include the apps and data you want to keep, and/or sufficiently old that it happened before the technical problem you’re trying to fix.
To see iCloud backups, open Settings on your iPhone or iPad and tap your name/face at the top. Now tap iCloud > Manage Storage > Backups. Tap a backup to see when it happened.
To see backups on your Mac, open iTunes, and click iTunes in the top bar and select Preferences. Select the tab labelled Devices. The date and time of each backup is listed.
if you’re not sure you’ve got a sufficiently recent backup, and if you’re able to, play it safe by doing another backup of the old device right now.
Restore from an iCloud backup
Apple allows iDevice backups in both iCloud and iTunes, and we’re going to start with iCloud.
Here’s why we needed to be so sure that a usable backup exists. Before we load the backup on to the device, we need to wipe off the data that’s on there right now, a process that is irreversible. (If your phone has already been wiped, or if it’s brand new, then you can skip the following paragraph.)
Open the Settings app, and go to General > Reset > Erase All Content and Settings. Confirm this is what you want to do.
With the erasure complete, you can power up your iPhone. Once you’re past the Hello screen and the first few steps you will reach a page entitled Apps & Data.

The first option is Restore from iCloud Backup. Select this and you’ll be asked to log in with your Apple ID.
Doing so presents you with a list of your iCloud backups. Check the date to see which is the most recent and tap that one. The iPhone will now automatically restore the chosen iCloud backup.
The device will need to be connected to Wi-Fi throughout the process, and it can take a while, depending on how much data needs to be restored. It’s also likely that you’ll be asked to log in again so that any purchased items from the App store or iTunes can be downloaded.
When the core elements of the backup are finished you’ll be able to use the handset again, but you might notice that apps and other data continue to install in the background. This is perfectly normal.
Restore from an iTunes backup
iTunes might not be the essential part of the iPhone experience that it once was (hence our advice on the best iTunes alternatives) and when macOS Catalina launches in the autumn of 2019 it will be discontinued entirely, and the following functions will be looked after by Finder. But for now it remains a great way to create or restore a local backup.
To get your iPhone up to speed you’ll first need to plug it into a Mac or PC running iTunes. If you’ve not connected the device to this particular computer before, you’ll see the ‘Welcome to Your New iPhone’ page.

Click continue and then agree to sync your iPhone to iTunes. With this completed, you’ll be taken to the device summary page in iTunes, which includes various options for backing up and restoring your device.

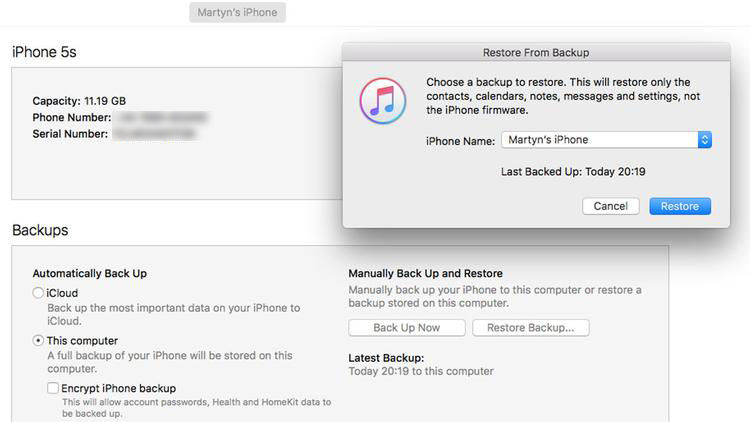
In the Backups section you’ll see a button marked Restore Backup. Click this.
If Find My iPhone is switched on then you’ll see a message telling you that it needs to be turned off before you can proceed. To do this, open Settings on your iPhone and tap your name/face at the top of the screen, then tap iCloud. Scroll down until you see Find My iPhone, tap it, move the toggle switch to off, enter your password to confirm, then return to iTunes on your Mac or PC.
After clicking Restore Backup a popup should appear with the current iterations available. Select the one you want, then click the Restore button.
Now your iPhone will run through its automated restoration process. iTunes will let you know when the update is complete, then you can disconnect the iPhone and go about your business with your data safely on board.
Author: Martyn Casserly, Contributor

Martyn has been involved with tech ever since the arrival of his ZX Spectrum back in the early 80s. He covers iOS, Android, Windows and macOS, writing tutorials, buying guides and reviews for Macworld and its sister site Tech Advisor.