

Apple loves to talk about how easy its products are to use, and the iPhone exemplifies that philosophy more, perhaps, than any other. But just because a device has a low barrier to entry and is accessible to beginners, that doesn’t mean there isn’t complexity under the skin.
This article is about taking the next steps with your iPhone and discovering all the things it can do that you didn’t know about. From advanced security to battery management and custom notifications, these are our 34 tips for iPhone users.
Speed up a sluggish iPhone
Computing devices tend to slow down over time, as components wear out, storage and memory fill up with old files and forgotten apps, and new software is increasingly designed for newer and faster processors.
You can put off the inevitable by following some simple best practices, including:
- From time to time you should power off your device completely. This clears out the memory.
- You should also get into the habit of deleting apps and files you don’t use (photos are a common issue for storage) and archive the latter in cloud and/or local backup.
- It’s also worth going through the settings and checking which apps refresh in the background, thereby using up precious processing power.
- Update iOS on your device.
Note that updating iOS has historically been a mixed blessing in regard to speeding up your iPhone, but with iOS 12 this has changed.
iOS 12 is particularly focused on performance. Apple claimed it would make older devices faster and in our tests it certainly appears to have done so.
More tips can be found in How to speed up a slow iPhone.
Turn on Dark Mode

If you’ve got iOS 13 on your iPhone (at time of writing it’s available as a public beta; it will launch official in September 2019), you can turn on a system-wide Dark Mode very easily. This gives all the pre-installed apps – and any third-party apps that have built in compatibility – a black or dark-grey background that’s more relaxing to read in the evening.
To turn on Dark Mode, open the Settings app and tap Display & Brightness. At the top of the next screen you’ll see Light and Dark options side by side – tap the one you want to use. You can also set Dark Mode to come on automatically at certain times, such as from dusk until dawn.
If you haven’t yet got hold of iOS 13, there are still some workarounds. You can try Invert Colours mode, Low Light mode, or Night Shift; each of these offers some of the benefits of Dark Mode. Read more in our dedicated article How to use Dark Mode on iPhone.
Improve your passcode security

You can unlock your iPhone with your fingerprint or face, depending on which model you have, but your iPhone is only secure if nobody can guess your passcode. If it’s 1234 you’re asking for trouble.
iOS now prompts users to create a six-digit passcode instead of the four-digit passcode (here’s how to turn a six-digit passcode back to four digits), but there is a more sophisticated way to make your iOS device more secure: using an alphanumeric passcode.
This means that you can use both letters and numbers in your password, giving you an almost unlimited number of possible passwords, as opposed to the roughly 1,000,000 possible six-digit passcodes, which could be hacked with the right equipment.
It’s fairly easy to change your passcode to an alphanumeric one:
- Open the Settings app.
- Tap ‘Touch ID and Passcode’ (or ‘Face ID and Passcode’ on X-series iPhones), then Change Passcode.
- When prompted to enter a new passcode, tap ‘Passcode Options’ and select ‘Custom Alphanumeric Code’.
- Now enter your new passcode. Make sure it’s one you can remember.
Here’s how to choose a good password.
There’s also a new way of securing your iPhone in iOS 12.
This security change means nobody will be able to plug a device into your iPhone in an attempt to hack into it. It kicks an hour after your iPhone was locked (unless you deselect the setting).
- You’ll find the setting in Settings > Touch ID & Passcode.
- Scroll down to Allow Access When Locked section and you’ll see USB Accessories.
- Make sure that it’s deselected if you don’t want devices to have access.
Create custom iMessages for calls you can’t answer

Sometimes it’s not the right time for a phone call; and while you could just let calls you don’t want to take go to voicemail, sometimes you want to explain why you’re not picking up. iOS let you quickly respond to a call with a text message.
Depending on which version of iOS you’re running, you either swipe upward on the phone icon that appears next to the unlock slider and choose Respond With Text, or tap the button labelled Message above the Slide To Answer slider.
By default, you’ll get three pre-written options (“Sorry, I can’t talk right now”, “I’m on my way” and “Can I call you later?”), along with a button that lets you enter text there and then.
However, you can customise the prepared messages:
- Go to Settings > Phone > Respond With Text.
You can’t have more than three responses, however: if you want to add a new one, you’ll have to sacrifice one of the current options. Tap the one you’re willing to lose and type in the new response.
Join a Group FaceTime call

This feature wasn’t ready in time for the release of iOS 12, but soon you will be able to partake in a group FaceTime call with up to 32 participants.
To make a group FaceTime video call you simply have to enter more than one contact into the address box when initiating the chat.
The interface is a little different: the tiles showing each participant (there can be up to 32) vary in size and prominence depending on how recently that person spoke.
Double-tapping a tile brings that person to the front in your view.
You can also launch a group FaceTime call from within Messages if a thread is getting particularly out of hand.
Want to know more? Here’s how to make a group FaceTime call.
Skip calls with Remind Me Later

Alternatively, you can get iOS to remind you to call back later. As with the auto-replies, the way you do this depends on your version of iOS: most likely, you tap the Remind Me button above the slide, but in earlier versions you had to swipe upwards before you could select Remind Me Later.
You can choose to be reminded in an hour, ‘When I Leave’ or (where applicable) ‘When I Get Home’. Make sure your address details are up to date in Contacts, so your iPhone knows where home is. The timings will be based on your GPS movements.
Create custom ringtones and alert tones in iTunes or GarageBand

You can create ringtones for your iPhone based on any music track in your iTunes library. We looked at this in depth here, but to sum up: create a short, sub-30-second duplicate version of the track; convert the file type of this track from .m4a to .m4r; re-import the track to iTunes as a ringtone; sync the ringtone with your iPhone.
Better still, you can create unique custom iPhone ringtones from your own audio creations, and this is especially user-friendly if you do the creative work on the iPhone itself. Create a 30-second track in GarageBand; go to the Share options and choose Ringtone; then assign it to a contact or notification.
How to set custom vibrations on your iPhone

Want to know who’s calling you without taking your phone out of your pocket? That’s easy – assign a ringtone to a contact. But what about doing it all silently? Not only can you assign a custom ringtone or text tone to a contact, you can even give them a custom vibration pattern.
- Open Phone or Contacts.
- Select a contact.
- Tap the Edit button in the top-right corner.
- Scroll down to find the ringtone field; below it is a vibration field.
- Tap Vibration and you’ll see an assortment of built-in vibration patterns you can choose from.
- Further down is the ability to add a custom pattern: tap Create New Vibration, and you can tap on the screen to create your own rhythm.
- When you’re satisfied (tap the Play button to see what it will feel like), tap Save to set the pattern.
If that’s not enough, go back to the contact and also assign a custom vibration pattern for text messages.
Customise the Control Centre

It was a long time coming, but in iOS 11 Apple finally allowed us to customise the toggles and options that appear in the Control Centre.
Go to Settings > Control Centre > Customise Controls. The controls that will appear are listed at the top, under the heading Include; tap the red minus sign to remove one, or tap and hold to drag them around and change the order.
Available controls that are not currently included are listed below, under the heading More Controls. Tap the green plus sign to add one.
Customise your Animoji
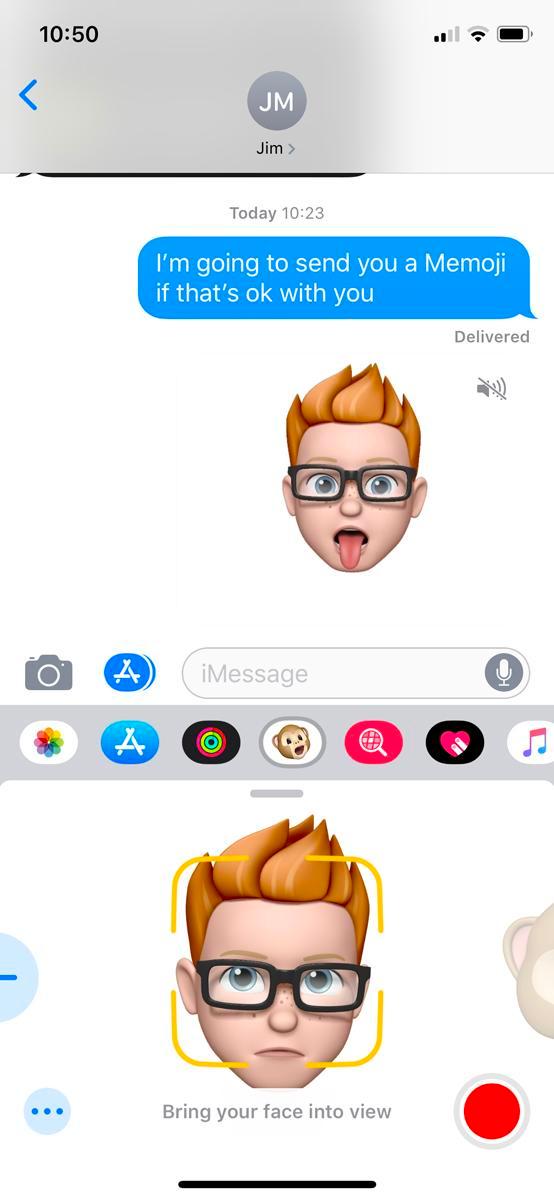
Owners of X-series iPhones (the X, XS, XS Max and XR) will already have enjoyed the pleasures of Animoji: the facial capture animations you can create and send to your mates.
But did you know that, since the launch of iOS 12, you’ve been able to create Animoji of your own? These are called Memoji, and they can look like you, or your favourite celebrity, or almost anyone you choose.
When sending an Animoji, the first stage is to choose the dog, robot, chicken, poop etc. But if you go to the far left of this selection pane you will see a plus sign with the words New Memoji underneath. Tap this and you will be walked through the (many) different customisation steps available to you.
We address this process in more depth here: How to create a custom Memoji.
Save battery with Low Power Mode

Whenever your iPhone drops below 20 percent power, a message will pop up to warn you of this fact and to offer to start Low Power Mode. But you can use this handy mode any time you want to make your battery last a little longer.
- Switch to Low Power Mode by tapping Settings > Battery > Low Power Mode.
Low Power Mode reduces power consumption by turning off a number of iPhone features. For example, it will reduce animations, decrease the time before the screen darkens, fetch Mail less frequently, turn off Hey Siri and background app refresh… It generally make every effort to eke out your battery life for a little longer.
You may not notice the difference (although you may not get a vital email or social media message unless you check for it). On the whole, though, the iPhone works as normal and the battery will last for much longer.
If you found this tip useful, you might also like our advice on How to improve iPhone battery life.
Maximise battery life

Speaking of eking out more battery life, you can check your battery usage on your iOS device to see if your own behaviour could improve things.
Apple lets you see which of your apps are using up the most battery on your device.
- Go to Settings > Battery.
- Scroll down the page to the section that shows the Last 24 hours, and the Last 4 Days.
Here you’ll see details about which apps used the most battery.
Apple also offers up Insights and Suggestions to help you save battery life in the section above. This could inslude turning down the screen brightness, or enabling auto-lock.
Shake to undo

This one can be a little awkward at times but it can be a bit of a life saver.
If you’ve just typed a long sentence and accidentally deleted it, or made some other catastrophic error, you can give your iPhone a shake to bring up the undo/redo dialogue box.
Just make sure you’re holding on to your iPhone tightly before you shake it!
Tap to top

Just scrolled down a really long list in Notes, or worked your weary way through a ton of emails? Instead of laboriously scrolling back to the top, you can jump there immediately by tapping at the very top of the iPhone’s screen.
We’d rank this tip with the double-space full stop: it’s reasonably widely known, but for everyone else it’s a game-changer.
And it’s not just Notes and Mail; tap to top works in most iPhone apps. Some apps, cleverly, offer an undo on this function, just in case you tap it by accident and lose your place in a long article. The excellent Instapaper pops up a Return to Position command, for instance – and if the menu bars have disappeared you have to tap the top of the screen twice to activate the feature in the first place.
Experiment to see if the app you’re using offers some other variation on or evolution of this handy feature.
Set up Do Not Disturb mode

Are you using the Do Not Disturb feature? It’s perfect for insulating you from distractions where you’re trying to work, or get some sleep.
Do Not Disturb can be activated from the Control Centre; swipe upwards from the bottom of the screen and tap the crescent moon icon.
A matching moon icon will then appear in the top bar of your iPhone screen. With Do Not Disturb activated, incoming calls and alerts will be silenced.
For a more advanced range of options, go to Settings > Do Not Disturb; this includes the ability (under the label Scheduled) to set ‘quiet hours’ each day or night. You can also allow exceptions: people who will be allowed to contact you even with this mode activated.
And in iOS 12 it’s now possible to set Do Not Disturb for one-off occasions, rather than at the same time every day.
To do so, hard press on the crescent moon icon in Control Centre and choose from the options: For 1 hour, Until this evening, Until I leave this location.
On a related note, you may be interested to know how to tell if someone is using Do Not Disturb.
Do Not Disturb While Driving

Do Not Disturb has some variant modes, such as Do Not Disturb During Bedtime in the iOS 12 update. But the most famous is the version introduced in iOS 11 to reduce distractions when driving. It blocks incoming notifications (but you can set an automated reply for selected contacts only along the lines of “I’m driving right now, will get back to you in a bit”) and blocks phone calls too, unless you’ve got a hands-free kit.
- Go to Settings > Do Not Disturb and then, under Do Not Disturb While Driving, tap Activate.
You’ll see there are three settings: Automatically (which attempts to work out when you’re driving by your motion, and which we wouldn’t recommend, given how many times we’ve seen this activate on trains), When Connected to Car Bluetooth, and Manually. Choose whichever option suits you.
Go back to the Do Not Disturb page of Settings and you’ll see the automated replies at the bottom of the screen. Select who you want to get this reply, and edit the reply by tapping Auto-Reply and then tapping the message.
Sometimes people find this mode annoyingly persistent; here’s how to turn off Do Not Disturb While Driving.
Take photos while shooting videos

You’re using your iPhone to film a magical moment, and you wish you could snap a photo at the same time. Don’t stop recording! Just tap the camera button, which appears onscreen in addition to the shutter button as you film.
You aren’t using the iPhone’s true photo sensor; you’re getting the slightly less impressive video sensors instead. But the photos should still turn out pretty nicely.
For more related advice, take a look at our iPhone camera tips.
Portrait Lighting

If you’ve got an iPhone 8 Plus, an iPhone X, an iPhone XS, or XS Max, you can access a photographic feature called Portrait Lighting (the XR has some Portrait Lighting features, but not all). We find Portrait Lighting a little inconsistent, but it can sometimes produce some attractive effects with very little effort.
Open the Camera app, and swipe across the bottom rotating menu so you’re in Portrait Mode.
Just above this label you’ll see a hexagonal icon and the label Natural Light, which indicates that you’re about to take a standard Portrait Mode shot, with the arty bokeh background blur. Very nice.
If you tap the Natural Light icon, however, it’ll pop up slightly and you’ll see it’s on a circular menu. Swipe across and you can scroll through the four other options: Studio Light, which brightens up the subject’s face and other ‘high points’ and is generally the most reliable mode; Contour Light, which darkens the shadows and sometimes produces a good effect, but often makes people look scruffy or unshaven; and two versions of Stage Light (colour and mono), which cut out the subject and place him or her against a dark background.
The Portrait Lighting effects are a little better in iOS 12, but we still find the mono modes to be a bit unreliable when it comes to curly hair.
Note that you don’t have to apply these effects while or before taking the shot. Open any photo which has the label Portrait at the top left, and you’ll be able to apply them retrospectively. Tap Edit, then tap the hexagon icon and you’ll be able to scroll through the options as above.
A new feature on the iPhone XS and XS Max allows you to adjust the blur after taking a picture.
It’s made possible by the separate of layers in photos. When we get to test out the iPhone XS we’ll fill you in on how it works.
Switch direction in Panorama mode

You can change the direction of your Panorama photograph in the Camera app by tapping the arrow that appears in the middle of the screen in the Panorama mode.
Use your headphones to take a selfie

Selfies continue to be all the rage, as we’re sure you’ve noticed, but if the quality of your selfies is a concern, try this handy trick.
A decent proportion of iPhone owners know that you can activate the camera shutter by pressing one of the volume buttons (volume up or volume down – doesn’t matter which) instead of the onscreen button. This tends to produce less camera shake.
But a still better option for selfies – and one that is far less widely known – is to use the volume button on an attached pair of headphones.
When the camera app is open on your iPhone, you can use the volume button on an attached pair of headphones to take a photo. Not only does this reduce shake even more than using the iPhone’s volume button, but it also means you can take a more natural-looking photo from further away or take a photo hands-free.
Make an iPhone safe for kids

Kids love iPhones – maybe a little more than is good for them. But there are steps you can take to ensure youngsters aren’t accessing unsuitable content on their devices.
Go to Settings > General > Restrictions and you can limit access to specified apps, block in-app purchases, and set an age range for appropriate content. All of this is covered in How to set up parental controls on an iPhone.
You should also look into the possibilities of Family Sharing, a feature that allows you to share apps and content between your family’s devices without having to pay for them more than once.
The arrival of iOS 12 will bring further parental controls in the form of Screen Time, which lets you set ‘allowances’ for use of certain apps or categories of app, warnings when time is running out and eventually a block. (They can ask for extra time, but you will get the final decision.)
Stop iPhone addiction

Speaking of Screen Time, it’s a new feature in iOS 12 that can help you be less addicted to your iPhone.
- To find out just how much of your time you are waiting on your iPhone, go to Settings > Screen Time.
Here you will find details on how long you use each app, how often you looked at your phone, and what apps you spent the most time with.
Tap on your device in the top section to see the Screen Time breakdown. You can look at the breakdown for today, or for the last seven days.
You can set Downtime, with only certain apps being available between certain hours, say after 9pm. You’ll get a reminder just before your Downtime starts. You can decide which apps are allowed during Downtime in the Always Allowed section.
It’s also possible to set App Limits (although these limits reset each day at midnight). For example, you could limit your Social Networking apps so you can only use them for one hour today.
You can set a Screen Time password to use when you need a few minutes more.
Quickly add symbols

You’ve probably been using your iPhone’s keyboard for ages without realising that it’s actually easier than you thought to add symbols to your messages.
Instead of tapping once on the 123 button, once on your chosen symbol and then once again on the ABC button to go back to the conventional keyboard layout, you can do the whole thing in one gesture.
Tap and hold the 123 button, slide your finger to select the symbol you want to insert, then release. Once it’s been added, your keyboard will automatically revert back to the letters keyboard. One tap instead of three: that’s some serious time savings right there.
Oh, and while we’re talking symbols: hold your finger on any letter or symbol for a second or two and you’ll see any alternative (usually related) symbols that the button can offer instead. The dollar key also offers pound, euro and yen symbols, for example. If you often type letters with accents this is also a quick and easy way to see an accented option.
There are many additional symbols hidden within your keyboard that you may never have discovered. Experiment!
One-handed keyboard

If you’re on iOS 11 or later you can use a system keyboard that’s designed for use with one hand (and only one thumb on that hand, realistically).
- Go to Settings > General > Keyboards, and tap One-Handed Keyboard. Select Left or Right.
Customise auto-correct text replacement

iOS’s QuickType system-wide keyboard is clever at guessing what you’re trying to write, and in many situations will auto-correct your clumsily typed screed into something far more accurate.
It gets better still, however, when you start customising it so that it knows your own personal favourite shortcuts and abbreviations and the full phrases you’d like it to expand those abbreviations into.
You might decide that “omg” should be turned into “Oh my God”, for example. “omw” should become “On my way”. And so on.
It’s easy to set up a personalised shortcut:
- Go to Settings > General, scroll down and tap Keyboard.
- Select Text Replacement. You’ll see what text replacements you currently have set up.
- To add a new one, tap the plus sign. Enter the desired full phrase (“MacBook Pro 2016 with Touch Bar” might be a good one for a tech journalist), the shortened version that you want to expand into the longer phrase (“MBP”, say), and tap Save.
Never fill in a password, address, or account info

If you want to save time and also benefit from not having to memorise passwords or account information, make sure you turn on auto-fill.
It’s possible for your iPhone, iPad, even your Mac, to enter your name, address, email, phone number, passwords and more automatically.
- Go to Settings > Safari > Autofill.
You’ll need to make sure the information you want to be filled in is correctly entered in your phone in various places – read this article for help setting up passwords, bank cards, names and addresses so they can be autofilled on your iPhone.
Finally, in iOS 12 or later, when a security code arrives in a text message it will automatically be available as a AutoFill suggestion – so you won’t even have to open the Messages app to see the code.
Get a thesaurus

There’s a thesaurus option in iOS, but you need to enable it. To do so, go to Settings > General > Dictionary. Now Select British English “Oxford Thesaurus of English” (or if you’re American, the “Oxford American Writer’s Thesaurus”).
While you’re here, you can download translations, such as French-English and Spanish-English too.
Now select a word by tapping on it.
Choose Look Up from the options (you may need to tap on the arrow to reveal extra options). Now you will see suggestions of alternative words, as well as the dictionary definition.
Rich formatting

While it’s not universally supported, you can use rich formatting in a number of iOS apps including Mail, Notes and third-party apps such as WhatsApp to make certain sections of text stand out. But while it’s easy to use, it’s also extremely easy to miss.
Just open an app that supports rich formatting, highlight the text you’d like to edit by double-tapping it and select the formatting menu, labelled BIU.
From there, simply select your preferred effect and it’ll be applied to the selected text.
Tap the arrow on the right to see additional effects such as struck-through text.
Quick-delete in the Calculator app

If you use the calculator app a lot, you might like this handy and little-known time-saving trick.
The Calculator app, like real-world calculators, doesn’t have a delete button, which can be annoying if you’ve just typed out a long number and made a mistake right at the end.
Fortunately you can swipe across the number in the black area at the top – left or right, it doesn’t matter – and for each swipe, a single digit will be removed from the end of the figure.
Stop music with a timer
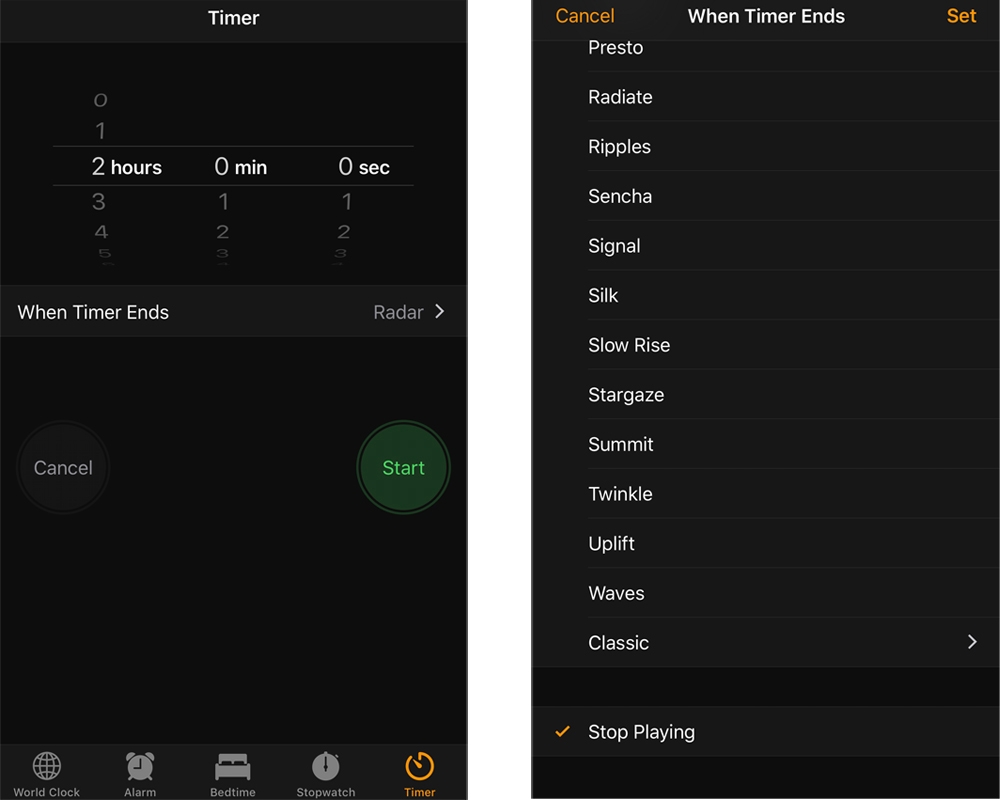
This is a cool trick for those of you who enjoy falling asleep to music. The problem with that is it’ll still be playing when you wake up in the morning, and you’ve probably just drained most of your battery in the process. Using the hidden ‘Stop Playing’ timer, you can choose how long you want the music to play for as you drift off to sleep.
Open the Clock app’s Timer tab. (You can just straight to this from Control Centre: tap the stylised clock face.) Choose how long you want your timer to last for and then tap ‘When Timer Ends’. Scroll down to the bottom of the menu and select ‘Stop Playing’.
Press start on the timer and then begin playing your music from the Music app. When the timer ends, the music will fade to a stop. This trick will also work for audiobooks and other media.
Search music by lyrics

In iOS 12 you have the additional option of searching for a track by a lyric – whatever phase it is that is stuck in your head since you heard it on the radio this morning.
Just open the Music app and type in the words in the Search field.
It should work even if you don’t have all the words, but the longer the phrase you type in the more likely it will give you a correct result.
You can also ask Siri the same question without typing anything.
Get your iPhone’s flash to blink when you get a message

If you find that the vibration or sound that your phone makes when you get a message is not always enough to attract your attention, there’s another element that you can add to the alert: light. By going to Settings > General > Accessibility and scrolling down to the ‘Hearing’ section, you can turn on ‘LED Flash for Alerts’.
Now every time you get a notification, the flash next to your iPhone’s rear-facing camera will blink.
Find words or phrases on a web page

It’s easy to find a particular word or phrase on a web page in Safari on iPhone.
While on the desired page, tap the top URL/search bar and type in the desired phrase. You’ll see a list of search results from the web, App Store and so on, but at the bottom of that list you’ll see “On This Page”, with the number of matches.
Tap it, and you’ll see that the results are highlighted in yellow. Tap the arrows at the bottom of the screen to scroll through the instances.
Use AirPods as a hearing aid

If you have a pair of AirPods, you can use the Live Listen feature in iOS 12 to turn your AirPods into a hearing aid.
Go to Settings > Control Centre > Customise Controls.
Tap on Hearing (under More Controls) to add it to your Control Centre.
Now when you choose this option in Control Centre it will magnify voices through your AirPods.
We can’t wait to try this out so that we can spy on what our friends say behind our backs.
Save a web page to Books

You can turn web pages into PDFs and add them directly to your Books app. This is handy if you’re reading a long web document, or especially if you’ve found an HTML book online and want to keep a copy of it.
When you tap Share, scroll across the apps to find Copy to Books.
Tap it and the web page will be converted and added to your book collection.
(Note that this option appears only if you’ve got Books on your iPhone! If you don’t you can still Save as PDF and add it to your Files).
Change Siri’s accent

English speakers have been able to change Siri’s voice from male to female with the choice of three accents since iOS 11; iOS 12 added the choice of Irish or South African too.
Go to Settings > Siri & Search > Siri Voice.
Here you can change an English speaking voice from Male to Female, or change the accent to American, Australian, British, Irish or South African.
Speaking of accents, Siri can translate into lots of different languages for you.
In iOS 12 gained the ability to translate words and sentences into even more languages – there are up to 50 different combinations.
We have a dedicated article showing how to translate using Siri.
It should be a simple case of saying: “Hey Siri, how do I say Good Night in Spanish”, for example.
Ask Siri to do maths for you

No matter how good a mathematician you might be, having Siri on hand to help with simple and complex maths questions is always useful.
Simply open Siri and recite your equation to it. If the number is complex, make sure you say it at a slightly slower pace so Siri doesn’t misunderstand.
We found Siri can also correctly divide, multiply, subtract and add, along with some slightly more complicated equations.
Create shortcuts for common tasks

In iOS 12 and later you can group tasks together and trigger them with a single Siri command.
You’ll need to download the Shortcuts app from the App Store.
Open the Siri Shortcuts app and tap on Gallery to see a gallery of ready-made shortcuts, such as Calculate Tip, Log Water, Make PDF, or Remind Me At Home.
Once you have the app on your iPhone, you will see suggestions of shortcuts you might want to use when you swipe down on your Home screen – Shortcuts can be found below your Siri Suggestions of apps you might want to use.
Just tap on the suggestion – which will be based on something you frequently do, such as send a group text message, and you will be taken straight to a message.
Read all about Siri Shortcuts here.
Measure things

The new Measure app in iOS 12 will make it easy to measure the dimensions of objects.
All you need to do is trace the sides of the object and it will tell you how long they are.
- Open the app and you will see the option to Move the iPhone to start.
- Eventually a circle will appear and the option to add a point.
- Add points and the app will tell you how many cm between them.
The Measure app is also the new home of the Level app.
This level can be used if you want to make sure that bookshelf you’re putting up is perfectly level.
The iPhone uses its Gyroscope to determine the level of the surface the iPhone is placed on. You’ll have the opportunity to calibrate it on a flat surface before assessing the situation.
Enable Night Shift

Night Shift dims the white tones of your display, in order to make it easier on your eyes in low-light conditions.
You can schedule Night Shift to take place at the same time every day, or you can manually enable it until tomorrow.
You can also adjust the colour temperature so that it is more or less warm.
- Go to Settings > Display & Brightness > Night Shift.
Have your iPhone read out your texts
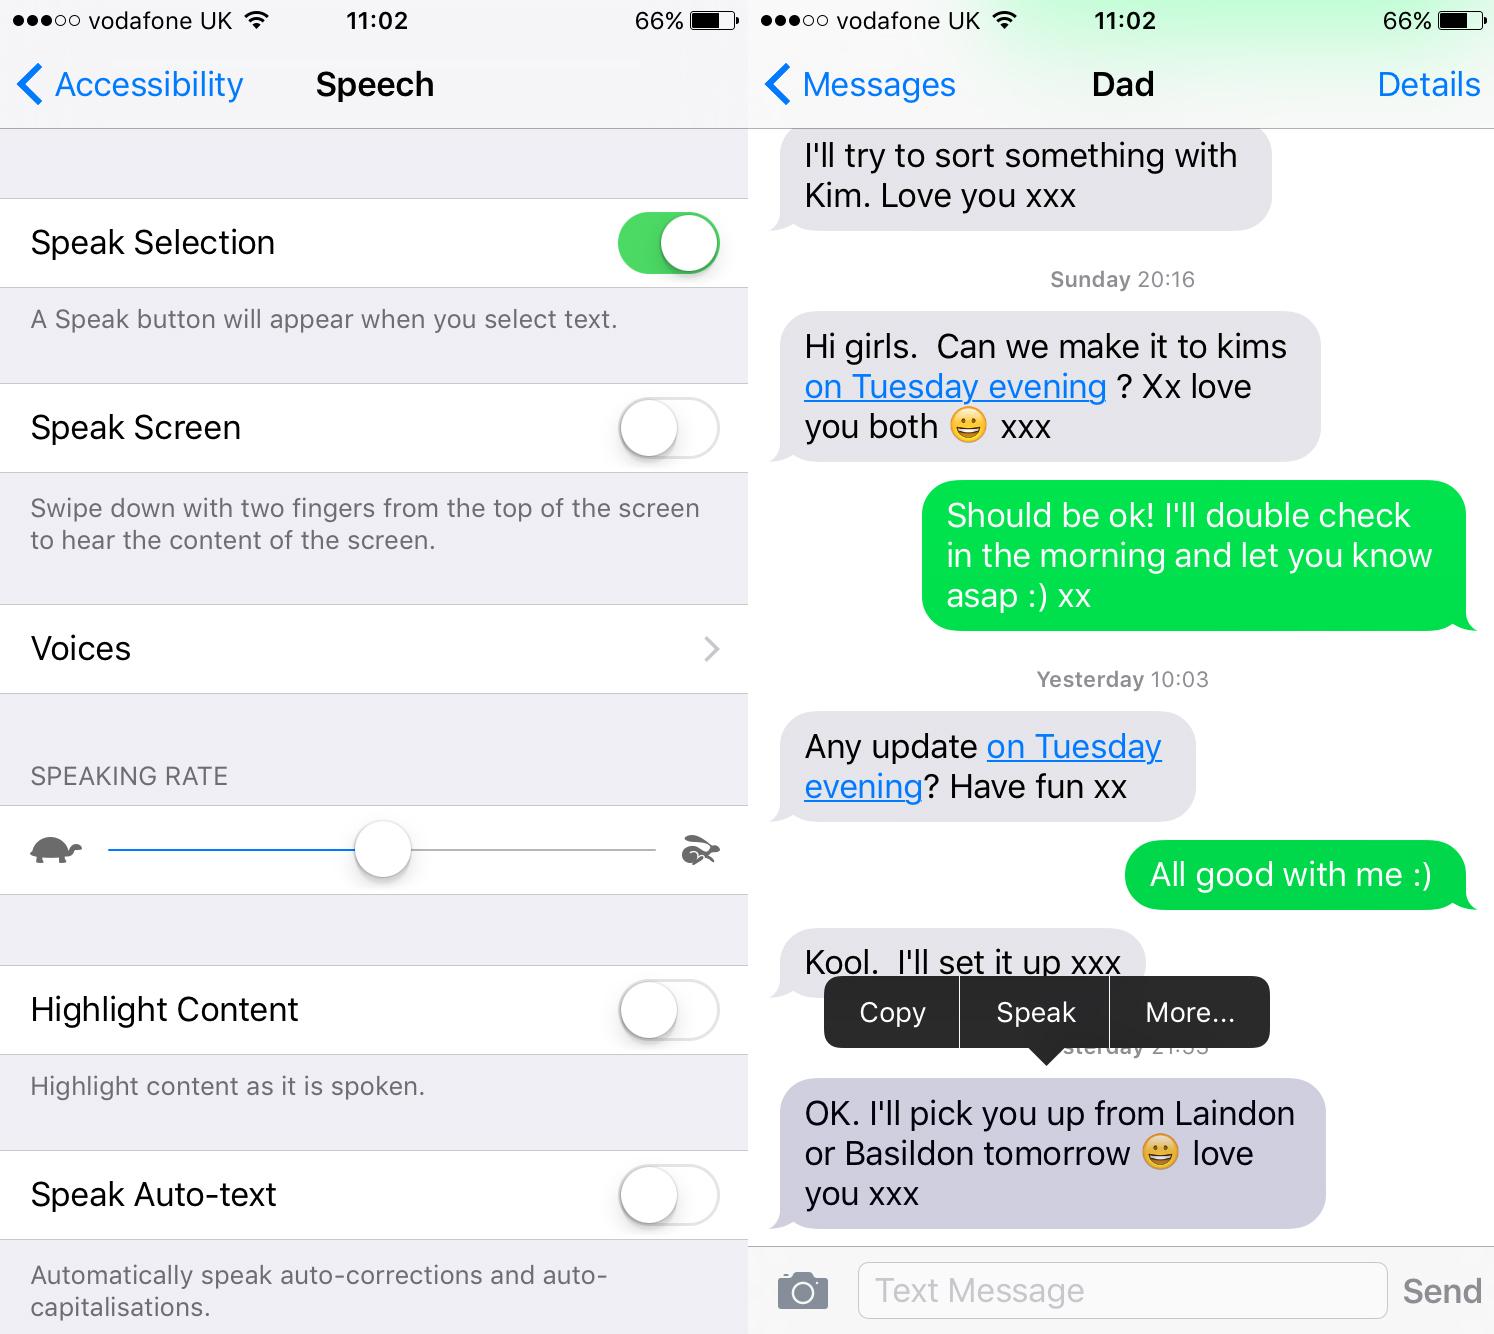
If you require or want your iPhone to read out your texts, then you can enable Speak Selection.
First of all navigate to Settings > General > Accessibility and toggle the option ‘Speak Selection’.
If you are to long-press on a speech bubble within your Messages, you’ll now find the option to ‘Speak’ – the option is especially useful if you have a long text message or decide to start driving and want to listen to the text whilst in hands-free mode.
See when a message was sent

Within the Messages app, you can swipe from right to left to reveal the time-stamps of each individual message.
Normally you’ll be able to see what date and at what time the first message was sent. However, to reveal each individual message after that, you’ll need to quickly glance at the timestamps by swiping.
This can be useful to either know what time the last message was received at, or to see if your friend was lying about arriving on time!
Call from within Messages

If you’re chatting via Messages and then decide it would be good to talk instead, you can simply tap on the icon for the person you’re texting to see options for an audio or FaceTime call.
You can start a group FaceTime call from a group Messages chat too – imagine that!
Author: Ashleigh Macro, Head of Affiliate

Ashleigh is Tech Advisor's Head of Affiliate. Providing expert buying advice you can trust is her forte, helping you to find the most reputable consumer tech products and services, and ensuring you don't spend a penny more than you should.